3D Printing: Easy as 1, 2, 3!
You may have noticed from our Facebook page that one of the great talking points at our booths at the recent ACA and ACS conferences was just how useful 3D printing has become. It has certainly created a stir in the CSD user community. Creating an experimentally accurate 3D printed molecule of any part of your crystal structure is now easy with the latest version of CSD-System (Mercury). To illustrate just how straightforward 3D printing from Mercury is – I recently used the following steps to produce a model of one of my own structures. Here’s how…
Step 1: Select your structure and the particular aspect of interest
The first crystal structure that I published in a full paper during my PhD at the University of Edinburgh was that of salicylaldoxime – the paper was a single crystal compression study for that compound. I particularly wanted to make a printed model of the ambient conditions structure (CSD refcode SALOXM03) which is in the CSD along with the other structures from the paper. The 3D model needed to capture an R44(10) hydrogen-bonded dimer (which is key to the compound’s copper binding properties as a ligand) and the π-π stacking between these H-bonded dimers (which is important energetically in the crystal structure).

Ray-traced images of the key intermolecular interactions in the ambient crystal structures of salicylaldoxime (CSD refcode SALOXM03) – hydrogen-bonded dimer (left) and π-π stacking interaction (right)
A Mercury view can contain symmetry-related molecules, so from the unique molecule, I generated the H-bonded dimer and then a second dimer related by stacking interactions using the “Show symmetry-related molecules” feature. To increase the likelihood of a successful 3D print I also switched to the “3D Print” display style, which makes all the objects in the model thicker – in particular the bonds and displayed contacts.
Step 2: Create the 3D printable model file
For the model file to represent my chosen structural view, I picked VRML as the output format. This format generates smaller files than STL, includes colour and crucially is supported by my chosen 3D printing service. I chose Shapeways on this occasion because we’ve had success using them in the past, and they are also now trialling a new material type: strong, flexible full colour plastic. My preferred view includes some molecules that are not connected by any solid contacts (the stacking direction) so I also chose to auto-generate a support and plinth in Mercury – this ensures that the model will be more stable and in one section.

Virtual 3D printing model file output directly from Mercury 3.6, as viewed in MeshLab
Step 3: Upload the model file to your preferred 3D printer
The final step was to upload my model file to my chosen 3D printing service and order a print! At this point you can choose the material type, though it helps to have an idea of this when designing your model. With some 3D printing services you can also re-scale the model at this stage if it is too big or too small.

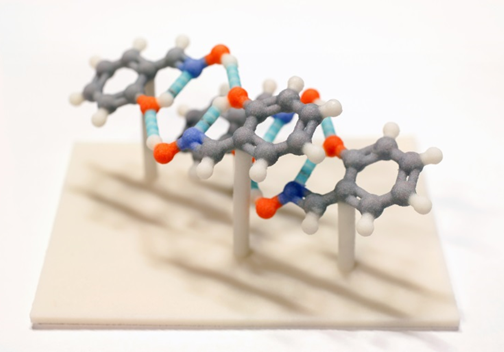
Photo of the final 3D printed model of salicylaldoxime form I in full colour plastic including plinth and supporting pillars
I’m very pleased with the final model – it really captures the important interactions in the crystal structure of this compound and it looks great on my desk. I hope you find the new 3D printing functionality in Mercury useful and please do share photos of your 3D prints with us via e-mail or our social media channels (#CSD3Dprint) – we’d love to see the kinds of models you’re producing!
Pete Wood, Product Manager for the CSD-System
Tags